

Yes, you can cut LED strip lights and they will still work — as long as you cut at the right place. Every modern LED strip has designated cut points marked by a scissors icon ✂️ or a pair of copper pads, usually spaced every 2–4 inches. Cut exactly there, and each piece functions as an independent, fully working strip. Cut anywhere else, and you’ll permanently damage that segment.
This guide covers where to cut, how to do it safely, how to reconnect cut pieces, and every mistake to avoid — whether you’re trimming strips for under-cabinet lighting, a TV backlight, or an accent wall. This design lets DIYers, homeowners, and professionals customize lengths without losing brightness, color control, or reliability.
However, success depends on following precise steps, choosing the right voltage and connectors, and avoiding common pitfalls. In this guide, we’ll cover the science behind cuttable strips, step-by-step instructions, reconnection methods, safety best practices, troubleshooting, and expert tips. Whether you’re installing under-cabinet lighting, accent walls, or a full-room setup, you’ll finish with the knowledge to cut confidently and avoid costly mistakes.

Why LED Strips Are Designed to Be Cuttable
LED strip lights consist of tiny surface-mount LEDs soldered onto a flexible printed circuit board (PCB). The board has copper traces that carry power (+ and –) and, for RGB or smart strips, control signals.
- Cut points are placed between repeating “segments.” Each segment (typically 3–6 LEDs) has its own complete circuit.
- Cutting through the center of the copper pads severs the connection cleanly without damaging the circuitry in either piece.
- Because segments run in parallel, shortening the strip doesn’t affect the voltage or current reaching the remaining LEDs. Brightness stays consistent.
Pro tip from manufacturers: Always cut unpowered. Powering a strip while cutting risks short circuits or blown LEDs.
Different Types of LED Strips: Which Ones Can You Cut?
Not every strip is equally cut-friendly. Here’s a quick breakdown:
| Type | Voltage | Cuttable? | Key Notes | Max Run Length (typical) |
|---|---|---|---|---|
| Standard Single-Color | 12V / 24V DC | Yes | Easiest for beginners; 2 copper pads | 12V: ~16 ft; 24V: ~33 ft |
| RGB / RGBW | 12V / 24V DC | Yes | 4–5 pins; match connector exactly | Same as above |
| Addressable (e.g., WS2812B, Govee) | 5V / 12V | Yes (with care) | Data line must align; one bad cut can break signal chain | Shorter runs |
| Waterproof (IP65+) | 12V / 24V DC | Yes | Cut through silicone carefully; reseal ends | Same |
| High-Voltage (AC 110/220V) | 110–220V AC | Generally No | Dangerous; exposes live wires; not DIY-friendly | Full reel lengths |

How to Connect Cut LED Strip Lights (Step-by-Step)
After cutting, you have three ways to use or reconnect the pieces:
1. Use each piece separately — Attach a new power connector to the cut end’s copper pads using a clip connector or by soldering. Each piece becomes an independent strip.
2. Bridge two pieces with a connector — Use a strip-to-strip clip connector to join the two ends. This is ideal for turning corners or bridging a small gap.
3. Extend with a wire — Use a wire-to-strip connector and run a length of 2-conductor wire (or 4-conductor for RGB) between the two pieces. This lets you route strips around obstacles.
Always match the connector pin count to your strip type, and double-check + and – alignment before powering on.
Follow these steps for a perfect cut every time.
- Measure twice: Determine exact length needed. Round down to the nearest cut point (better a small gap than an overhang).
- Power off: Unplug the entire strip from its power supply.
- Locate the cutline: Look for the scissor’s icon ✂️ or pair of copper pads (often labeled + and –). They repeat every 50–100 mm depending on the model.

How To Cut LED Strip Lights Without Damaging Them (Step-by-Step Guide)
- Cut precisely: Use sharp, clean scissors or a utility knife. Cut straight down the center of the copper pads. A jagged cut can damage traces or prevent connector contact.
- Test immediately: Reconnect the power supply to the original (uncut) end. The shortened strip should light up normally. The cut-off piece can also be tested separately if you plan to reuse it.
Time required: Under 2 minutes once you’ve practiced.
Reconnecting and Extending Cut Pieces
The real power of cuttable strips comes from reusing every inch. You have two reliable methods:
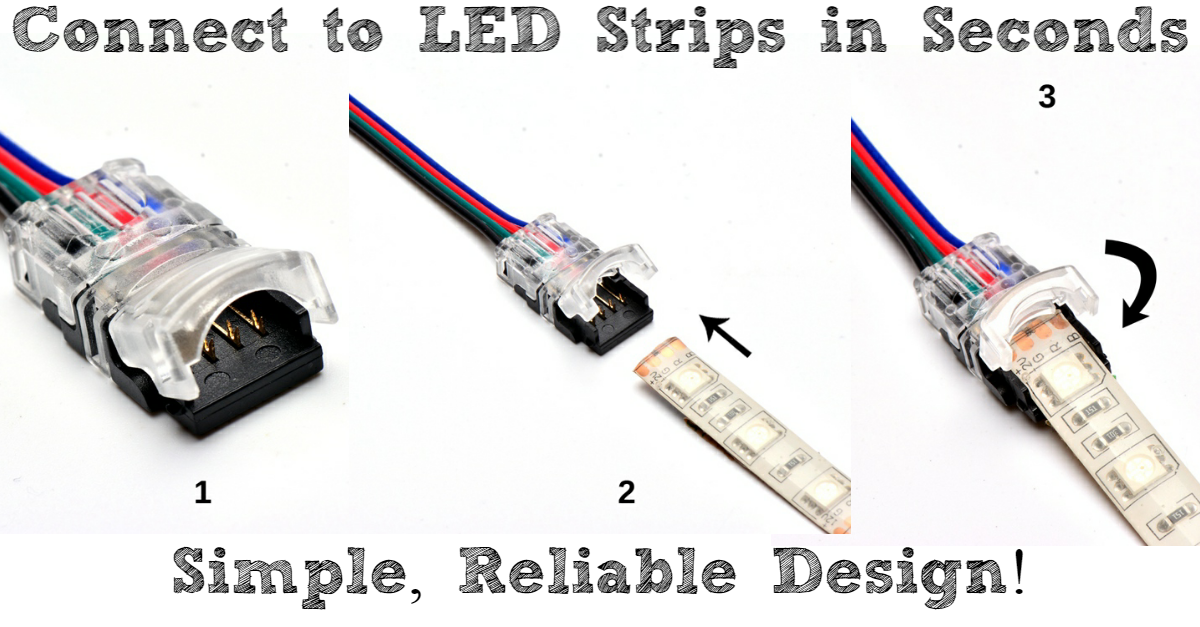
Option 1: Clip-on Connectors (Recommended for beginners)
These solder-free plastic clips match strip width (8 mm, 10 mm, 12 mm) and pin count (2-pin single color, 4-pin RGB, 5-pin RGBW).
- Open the clip, insert the cut end so copper pads touch the metal contacts, align polarity (+ to +), snap shut.
- Test before final installation.

Option 2: Soldering (For permanent, weatherproof installs)
- Strip ¼ inch of wire, tin the ends, and solder to the copper pads (positive to positive).
- Use heat-shrink tubing or silicone sealant on waterproof strips.
- Stronger than clips but requires a fine-tip soldering iron and practice.
Corner and gap connectors let you turn 90° angles or bridge small gaps without visible wires.
Before-and-after example: Many users cut a 16.4 ft reel into custom lengths for shelves and reconnect the leftovers into a second project, zero waste.
Common Mistakes That Kill Your Strips (And How to Avoid Them)
- Cutting between pads → Entire segment (or more) goes dark permanently.
- Using mismatched connectors → Width or pin count off by 2 mm = no contact or shorts.
- Ignoring polarity → Strip simply won’t light (easy fix: flip the connector).
- Folding sharply or overstretching → Cracks copper traces.
- Leaving cut ends unsealed → Moisture or dust shorts waterproof strips.
- Powering before testing → Risk of damage if cut was imperfect.
Troubleshooting quick fixes:
- No light? Check polarity and connector seating.
- Dim or flickering? Voltage drop, add a power injector or switch to 24V.
- One color missing on RGB? Data line misalignment (re-cut and reconnect).
Safety and Best Practices for Professional Results
- Always disconnect power before cutting or connecting.
- Work on a non-conductive surface.
- For outdoor or wet areas, use IP67+ strips and reseal every cut end with silicone or end caps.
- Never exceed the manufacturer’s maximum run length without power injection.
- Store spare connectors with your strips, they’re cheap insurance.
- For smart/addressable strips, consult the specific app or manual; some require the first LED after a cut to be a “start” pixel.
Following these practices gives your installation the same longevity and performance as factory-length strips.
Final Thoughts: Cut Smart, Light Better
Cutting LED light strips is not only possible, it’s one of the biggest advantages of flexible LED technology. With the right technique, matching connectors, and attention to voltage and polarity, you can create perfectly tailored lighting that looks factory-installed and performs flawlessly for years.
Whether you’re a weekend DIYer turning a plain room into a mood-lit haven or a pro installer optimizing every inch for a client, this guide equips you with manufacturer-backed knowledge and real-world best practices.
Ready to start your project? Grab your measuring tape, sharp scissors, and a pack of matching connectors. Measure twice, cut once, and enjoy custom lighting that works exactly the way you envisioned.
Frequently Asked Questions
Can you cut LED strip lights anywhere?
No. You can only cut at the marked cut points, the copper pads or scissors icons. Cutting between these lines severs the circuit for that segment permanently. The cut points repeat every 50–100mm depending on the strip model.
Can you cut LED strip lights and reconnect them?
Yes. Cut pieces can be reconnected using clip-on connectors (no tools needed) or by soldering wires to the copper pads. Clip connectors are the easiest method; they snap onto the cut end and bridge two pieces or extend the strip with a wire.
How do you cut LED strip lights without damaging them?
Use sharp scissors or a utility knife. Cut straight down the center of the copper pads, not across the LEDs. Always unplug the strip before cutting — powering a strip while cutting it risks short circuits and blown LEDs.
How do you connect cut LED strips back together?
Use a matching clip-on connector (2-pin for single color, 4-pin for RGB, 5-pin for RGBW). Open the clip, slide both cut ends in so the copper pads align with the metal contacts, check polarity (+ to +), and snap shut. Test before mounting.
Can you cut LED strips and use both pieces?
Yes. Both the original piece and the cut-off segment work independently — each cut creates two functional strips, provided each piece is at least one full segment long.
Do cut LED strip lights need a new power supply?
No, as long as you’re reusing the same strip at a shorter length. A shorter strip draws less current, so your existing power supply is fine. Only add a new power supply if you’re extending the total length beyond its rating.